In one of my previous posts, I showed how you can deploy OpenShift Enterprise on AWS using the official CloudFormation template provided by Red Hat. For that deployment to work, you had to have a Red Hat/OpenShift enterprise account which many developers might not have especially if you are looking to just spin up a cluster for personal projects.
That’s why in this post, I will be showing you how you can deploy an OpenShift cluster easily on AWS without an enterprise account using OpenShift Origin 3.11. While OpenShift Origin is free to use, we will be using some EC2 instances (t2.xlarge and t2.large) that are not free. Keep that in mind.
So, the easiest way to deploy any kind of cluster on AWS is through a CloudFormation template because it can automate the whole process and allows you to easily shut down the cluster once you are done. It’s even better if someone else has already written this CloudFormation template for you. 🙂 In our case, we will using the template shared by Thilina Manamgoda here. I will be making minor changes to the template and the steps from the original post to show what worked for me. Credit completely goes to Thilina for making our lives easier and hopefully, this post will make your life easier.
Deploying an AWS cluster
Before we can install OpenShift, we will need to first deploy a simple AWS cluster first.
Our cluster will consist of:
- 1 master node (t2.xlarge, 30GB EBS)
- 2 worker nodes (t2.large, 30GB EBS)
Besides that, Thilina’s OpenShift template will also setup some security groups.
Creating a Key Pair
If you have a key pair already in this region then you don’t need to create one. If you don’t, you can create one by going to EC2 page >> Key Pairs tab under Network & Security section on the left side >> Create Key Pair.
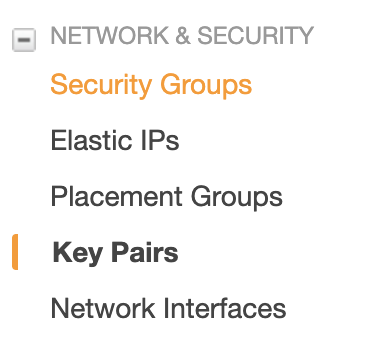
This key pair will be used by CloudFormation to create the stack as well as by you to access your servers.
Finding the right AMI
To use the CloudFormation template, you need to provide it with an AMI to use for the EC2 instances. This can depend on your requirements and which region you are deploying in. I chose to deploy my cluster in ‘Tokyo’ region.
Based on that, you will need to find a suitable AMI available in that region. Note that all AMIs you see on AWS are not available in all regions so you need to make sure that your AMI is available in your region.
The requirement to get this template to work is that your AMI should be using CentOS (x86_64) with Updates HVM. I chose an AMI with CentOS 7.4 – ami-0c1c738e580f3e01f.
You can search for public AMIs by clicking on ‘AMIs’ link under ‘Images’ category on left navigation on EC2 page.
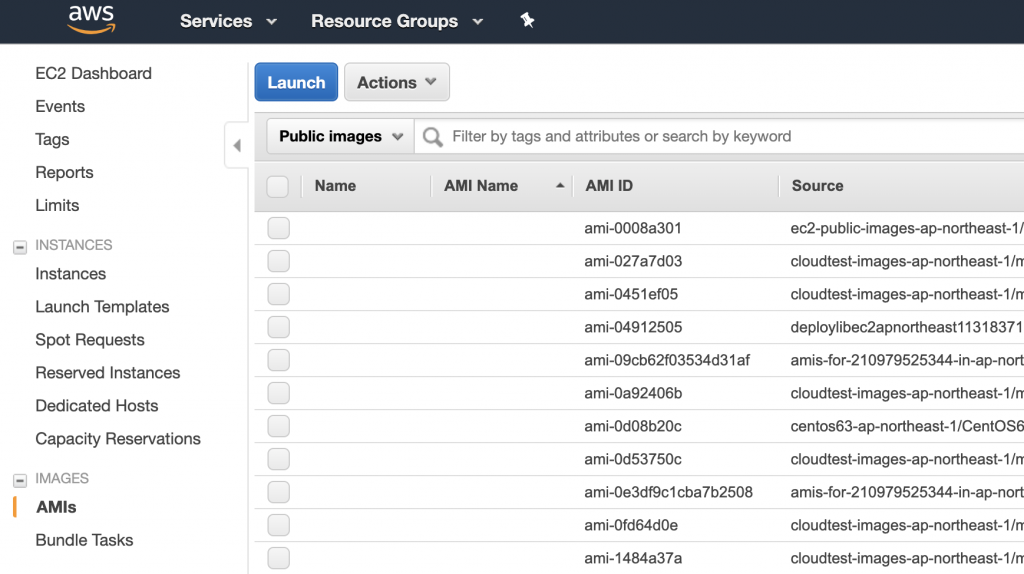
There you can search for any image which has CentOS. Copy the ‘AMI ID’ when you have made your decision because you will need it later.
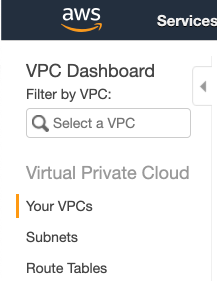
Getting your VPC ID
You will also need your VPC ID to use the CloudFormation template. You can get it by going to your VPC page and then selecting ‘Your VPCs’ from left navigation bar. You will see your VPCs there (if you have multiple), including your Default VPC. Copy the VPC ID for the VPC you want to deploy this cluster into because you will need it later as well.
Creating your IAM role
You will need to create an IAM role which will be attached to your EC2 instances when they are created. If you don’t have an IAM role already, easiest way to create one is through the AWS portal. You can do this via CloudFormation as well but for now, we will just do it via the AWS Portal.
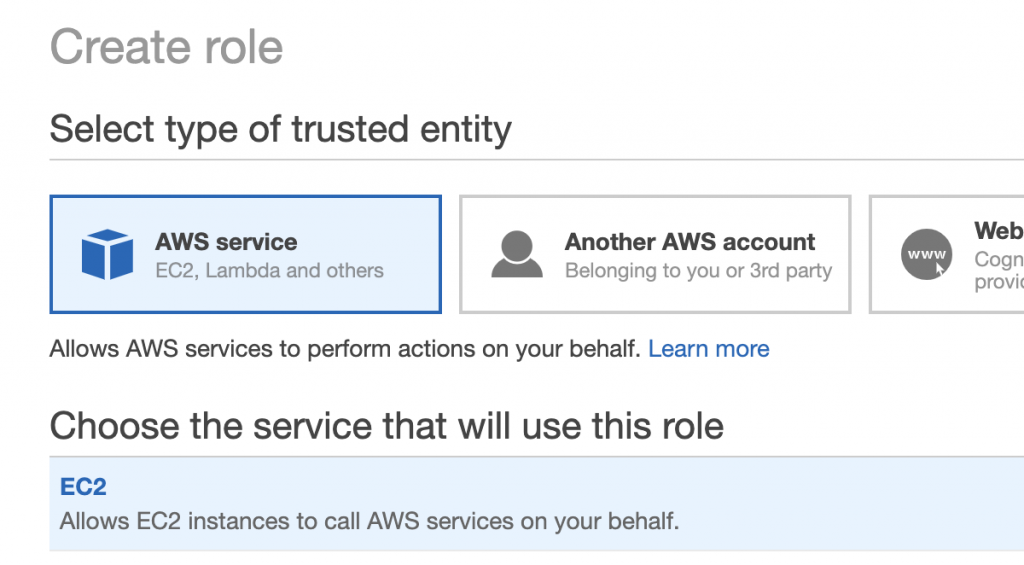
To create a new IAM role, go to IAM page and click on ‘Roles’ on left navigation bar and then click on ‘Create role’ button.

On the next page, select ‘AWS Services’ and then select ‘EC2’ for ‘Choose the Service that will use this role’.
For this demo purpose, I am going to give admin privileges to my role. This is not recommended for other use cases. Pick the appropriate Policy name and click ‘Next’.
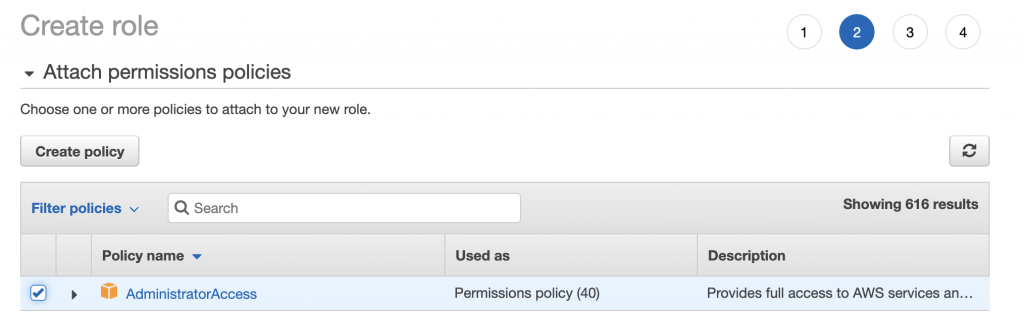
Add Tags if you like on the next page and click ‘Next’.
Finally, add your Role name. I will call mine openshift-admin. Click ‘Create role’ and you now have a new role which you can use for your Openshift deployment.

Finalizing CloudFormation Template
Now that we have the AMI and VPC ID, add them to Thilina’s OpenShift template. Replace AMI_ID and VPC_ID with the appropriate values. Note that I have added ‘Name’ tag so that when you go to your EC2 Dashboard, you can easily identify which instance is your master node and which instances are your worker nodes.
Additionally, replace IAM_ROLE with the name of your IAM role. In my case, that would be the role I created in the previous section: openshift-admin.
AWSTemplateFormatVersion: "2010-09-09"
Parameters:
  KeyPairName:
    Description: "The private key used to log in to instances through SSH"
    Type: 'AWS::EC2::KeyPair::KeyName'
Resources:
  Master:
    Type: "AWS::EC2::Instance"
    Properties:
      Tags:
      - Key: Name
        Value: openshift-master
      - Key:  kubernetes.io/cluster/openshift
        Value: owned
      IamInstanceProfile: IAM_ROLE
      ImageId: "AMI_ID"
      InstanceType: "t2.xlarge"
      KeyName: !Ref KeyPairName
      SecurityGroupIds:
        - !Ref OpenshiftMasterSecurityGroup
        - !Ref OpenshiftInternalSecurityGroup
      BlockDeviceMappings:
        - DeviceName: "/dev/sda1"
          Ebs:
            VolumeType: "io1"
            Iops: "200"
            DeleteOnTermination: "true"
            VolumeSize: "30"
  Node1:
    Type: "AWS::EC2::Instance"
    Properties:
      Tags:
      - Key: Name
        Value: openshift-node1
      - Key:  kubernetes.io/cluster/openshift
        Value: owned
      IamInstanceProfile: IAM_ROLE
      ImageId: "AMI_ID"
      InstanceType: "t2.xlarge"
      KeyName: !Ref KeyPairName
      SecurityGroupIds:
        - !Ref OpenshiftSSHSecurityGroup
        - !Ref OpenshiftInternalSecurityGroup
      BlockDeviceMappings:
        - DeviceName: "/dev/sda1"
          Ebs:
            VolumeType: "io1"
            Iops: "200"
            DeleteOnTermination: "true"
            VolumeSize: "30"
  Node2:
    Type: "AWS::EC2::Instance"
    Properties:
      Tags:
      - Key: Name
        Value: openshift-node2
      - Key:  kubernetes.io/cluster/openshift
        Value: owned
      IamInstanceProfile: IAM_ROLE
      ImageId: "AMI_ID"
      InstanceType: "t2.xlarge"
      KeyName: !Ref KeyPairName
      SecurityGroupIds:
        - !Ref OpenshiftSSHSecurityGroup
        - !Ref OpenshiftInternalSecurityGroup
      BlockDeviceMappings:
        - DeviceName: "/dev/sda1"
          Ebs:
            VolumeType: "io1"
            Iops: "200"
            DeleteOnTermination: "true"
            VolumeSize: "30"
  OpenshiftMasterSecurityGroup:
    Type: 'AWS::EC2::SecurityGroup'
    Properties:
      VpcId: VPC_ID
      GroupDescription: Openshift Security Group for Master node
      Tags:
      - Key:  kubernetes.io/cluster/openshift
        Value: owned
      SecurityGroupIngress:
        - IpProtocol: tcp
          FromPort: 22
          ToPort: 22
          CidrIp: 0.0.0.0/0
        - IpProtocol: tcp
          FromPort: 80
          ToPort: 80
          CidrIp: 0.0.0.0/0
        - IpProtocol: tcp
          FromPort: 443
          ToPort: 443
          CidrIp: 0.0.0.0/0
        - IpProtocol: tcp
          FromPort: 8443
          ToPort: 8443
          CidrIp: 0.0.0.0/0
  OpenshiftSSHSecurityGroup:
    Type: 'AWS::EC2::SecurityGroup'
    Properties:
      VpcId: VPC_ID
      GroupDescription: Openshift Security Group for Internal SSH
      Tags:
      - Key:  kubernetes.io/cluster/openshift
        Value: owned
      SecurityGroupIngress:
        - IpProtocol: tcp
          FromPort: 22
          ToPort: 22
          SourceSecurityGroupId: !Ref OpenshiftMasterSecurityGroup
  OpenshiftInternalSecurityGroup:
    Type: 'AWS::EC2::SecurityGroup'
    Properties:
      VpcId: VPC_ID
      GroupDescription: Openshift Security Group for Internal nodes
  Internal53TCPIngress:
    Type: 'AWS::EC2::SecurityGroupIngress'
    Properties:
      GroupId: !Ref OpenshiftInternalSecurityGroup
      IpProtocol: tcp
      FromPort: 53
      ToPort: 53
      SourceSecurityGroupId: !Ref OpenshiftInternalSecurityGroup
  Internal8053TCPIngress:
    Type: 'AWS::EC2::SecurityGroupIngress'
    Properties:
      GroupId: !Ref OpenshiftInternalSecurityGroup
      IpProtocol: tcp
      FromPort: 8053
      ToPort: 8053
      SourceSecurityGroupId: !Ref OpenshiftInternalSecurityGroup
  Internal8053UDPIngress:
    Type: 'AWS::EC2::SecurityGroupIngress'
    Properties:
      GroupId: !Ref OpenshiftInternalSecurityGroup
      IpProtocol: udp
      FromPort: 8053
      ToPort: 8053
      SourceSecurityGroupId: !Ref OpenshiftInternalSecurityGroup
  Internal53UDPIngress:
    Type: 'AWS::EC2::SecurityGroupIngress'
    Properties:
      GroupId: !Ref OpenshiftInternalSecurityGroup
      IpProtocol: udp
      FromPort: 53
      ToPort: 53
      SourceSecurityGroupId: !Ref OpenshiftInternalSecurityGroup
  Internal2379Ingress:
    Type: 'AWS::EC2::SecurityGroupIngress'
    Properties:
      GroupId: !Ref OpenshiftInternalSecurityGroup
      IpProtocol: tcp
      FromPort: 2379
      ToPort: 2379
      SourceSecurityGroupId: !Ref OpenshiftInternalSecurityGroup
  Internal4789Ingress:
    Type: 'AWS::EC2::SecurityGroupIngress'
    Properties:
      GroupId: !Ref OpenshiftInternalSecurityGroup
      IpProtocol: tcp
      FromPort: 4789
      ToPort: 4789
      SourceSecurityGroupId: !Ref OpenshiftInternalSecurityGroup
  Internal10250Ingress:
    Type: 'AWS::EC2::SecurityGroupIngress'
    Properties:
      GroupId: !Ref OpenshiftInternalSecurityGroup
      IpProtocol: tcp
      FromPort: 10250
      ToPort: 10250
      SourceSecurityGroupId: !Ref OpenshiftInternalSecurityGroup
Save the template to a file locally.
Create CloudFormation Stack
Now that we have the template, go to CloudFormation page and click on ‘Create Stack’ and upload your template file by clicking on ‘Upload a template file’ button and selecting ‘Choose file’.
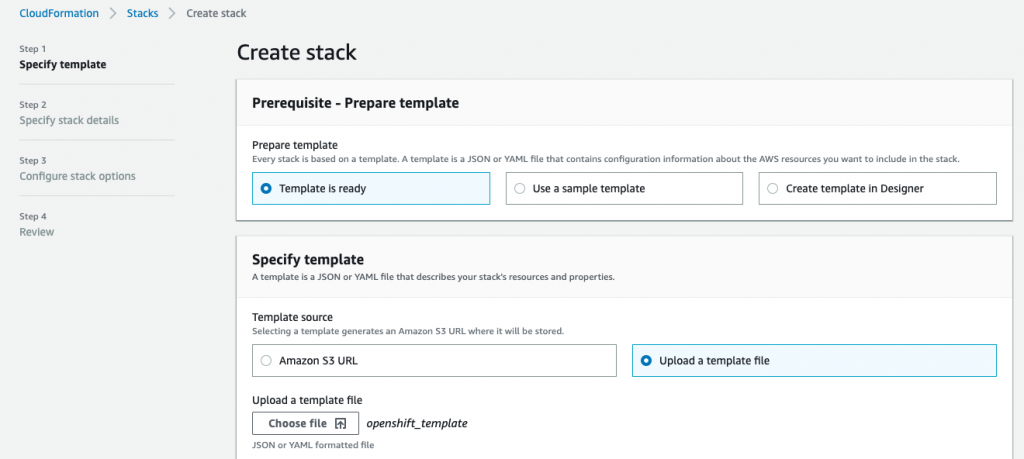
Click ‘Next’ once your template has been uploaded.
Enter a value for ‘Stack Name’. I simply called mine ‘openshift’.
In Parameters, you have to provide a value for ‘KeyPairName’. This is the key pair you want to use to create your stacks as well as to access your servers later. Select the appropriate key pair and click ‘Next’.
You can leave next page as it is and click ‘Next’.
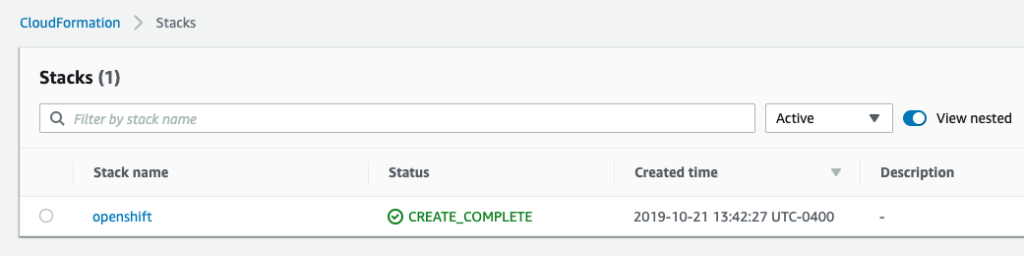
Review your details and click ‘Create stack’.
It should take approximately 1 minute for your stack to be created. Your Stack will be in ‘CREATE_COMPLETE’ status once it’s up. You might get an error in this stage saying your AMI was not available in this region. Make sure to find a public AMI that is available in the region you are deploying your stack in.
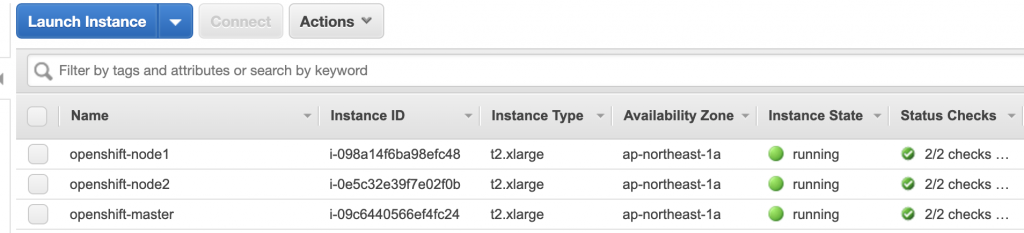
You can go to your EC2 page to see your master node and worker nodes that were created by the template.
Installing necessary libraries
Now that we have our servers up and running, we can go ahead and install necessary libraries which are needed to finally install OpenShift Origin. We will be using Ansible to automate this process.
To be able to use Ansible to deploy OpenShift Origin on all 3 servers, you will need to create 2 files (prepare.yaml and inventory.yaml) on your master node in the home directory.
Copy your Key Pair to your Master Node
We will need to copy our key pair to our master node so we can login to our worker nodes from our master node.
$ scp -i himanshu-tokyo.pem himanshu-tokyo.pem centos@<ip-address>.ap-northeast-1.compute.amazonaws.com:/home/centos/
himanshu-tokyo.pem                                                                                        100% 1692     8.7KB/s   00:00
Create inventory.yaml file
Create inventory.yaml on your local host and replace the following keywords with the actual values that you can find on your EC2 page:
- public_hostname_master_node
- private_hostname_master_node
- private_hostname_worker_node_1
- private_hostname_worker_node_2
[OSEv3:children]
masters
etcd
nodes
[OSEv3:vars]
ansible_ssh_user=centos
ansible_sudo=true
ansible_become=true
deployment_type=origin
os_sdn_network_plugin_name='redhat/openshift-ovs-multitenant'
openshift_install_examples=true
openshift_docker_options='--selinux-enabled --insecure-registry 172.30.0.0/16'
openshift_master_identity_providers=[{'name': 'htpasswd_auth', 'login': 'true', 'challenge': 'true', 'kind': 'HTPasswdPasswordIdentityProvider'}]
openshift_master_htpasswd_users={'admin' : '$apr1$zTCG/myL$mj1ZMOSkYg7a9NLZK9Tk9.'}
openshift_master_default_subdomain=apps.public_hostname_master_node
openshift_master_cluster_public_hostname=public_hostname_master_node
openshift_master_cluster_hostname=public_hostname_master_node
openshift_disable_check=disk_availability,docker_storage,memory_availability
openshift_hosted_router_selector='node-role.kubernetes.io/infra=true'
openshift_cloudprovider_kind=aws
openshift_clusterid=openshift
[masters]
private_hostname_master_node
[etcd]
private_hostname_master_node
[nodes]
private_hostname_master_node openshift_node_group_name='node-config-master-infra' openshift_schedulable=true
private_hostname_worker_node_1 openshift_node_group_name='node-config-compute'
private_hostname_worker_node_2 openshift_node_group_name='node-config-compute'
Note that we are creating a user here with username ‘admin’ and password ‘admin’ as well. These credentials will be used to login to OpenShift after it has been deployed. Note: This is obviously not the recommended way for production applications but for our demo use case, it works. htpasswd is being used here as the identity provider.
Once created, copy it over to your master node.
scp -i himanshu-tokyo.pem inventory.yaml centos@<ip-address>.ap-northeast-1.compute.amazonaws.com:/home/centos/Create prepare.yaml file
Similarly, create a new file locally called prepare.yaml with the following content and copy it to your master node. You don’t need to change anything here.
---
-
  gather_facts: false
  hosts: nodes
  pre_tasks:
    -
      name: "install python2"
      raw: "sudo yum install -y python"
    -
      name: "remove docker"
      raw: "sudo yum remove docker* -y"
    -
      name: "remove kubernetes"
      raw: "sudo yum remove kube* -y"
    -
      name: "install NetworkManager"
      raw: "sudo yum install -y NetworkManager"
  tasks:
    -
      name: "install the latest version of Apache"
      retries: 3
      yum:
        name: docker
        state: latest
    -
      name: "enable network-manager"
      shell: "sudo systemctl enable NetworkManager && sudo systemctl start NetworkManager"
    -
      name: "enable docker"
      retries: 3
      shell: "sudo systemctl enable docker && sudo systemctl start docker"
    -
      name: "Add repository"
      yum_repository:
        baseurl: "https://rpms.svc.ci.openshift.org/openshift-origin-v3.11/"
        description: "OKD 311 repo"
        gpgcheck: false
        name: okd
I have added two steps in the prepare.yaml file: remove docker and remove kubernetes. When I was using Thilina’s version, I was getting errors saying there was a conflict with my existing docker and kubernetes libraries installed on my servers. This could be due to the AMI I was using and you might not encounter it at all but after a lot of trial and error, I realized removing docker* and kubernetes libraries allowed my installation to proceed.
scp -i himanshu-tokyo.pem prepare.yaml centos@<ip-address>.ap-northeast-1.compute.amazonaws.com:/home/centos/prepare.yaml is used to install and configure few things (Docker, Network Manager Service, SE Linux Policies, OpenShift Origin) on all our servers via ansible.
Login to your Master Node
Now that we have the necessary files copied over to our master node, let’s login to the server.
$ ssh -i himanshu-tokyo.pem centos@<ip-address>.ap-northeast-1.compute.amazonaws.comDo an ‘ls’ to confirm that we have all the necessary files:
[centos@<ip-address> ~]$ ls
himanshu-tokyo.pem  inventory.yaml  prepare.yaml
Install Git and check out OpenShift Origin
[centos@<ip-address> ~]$ sudo yum -y install gitOnce git is installed, checkout OpenShift Origin and then switch to 3.11 branch.
[centos@<ip-address> ~]$ git clone https://github.com/openshift/openshift-ansible
Cloning into 'openshift-ansible'...
remote: Enumerating objects: 144151, done.
remote: Total 144151 (delta 0), reused 0 (delta 0), pack-reused 144151
Receiving objects: 100% (144151/144151), 39.31 MiB | 12.09 MiB/s, done.
Resolving deltas: 100% (90536/90536), done.

[centos@<ip-address> ~]$ cd openshift-ansible/

[centos@<ip-address> openshift-ansible]$ git checkout release-3.11
Branch release-3.11 set up to track remote branch release-3.11 from origin.
Switched to a new branch 'release-3.11'
Install Ansible
Thilina’s post recommends installing pip and then install a specific version of ansible (2.6.5) but I have tried with latest version and it has worked for me.
[centos@<ip-address> ~]$ sudo yum install ansibleSSH into your worker nodes from your master node
You will need to SSH into your worker nodes so that these hostnames can be added to known hosts during installation. Note you will have to run the ssh command from your master node.
/ SSH into worker node 1 from master node
[centos@<ip-address> ~]$ ssh -i himanshu-tokyo.pem <private_ip_worker_node1>

/ SSH into worker node 2 from master node
[centos@<ip-address> ~]$ ssh -i himanshu-tokyo.pem <private_ip_worker_node2>
Installing OpenShift Origin
At this point, you should be ready to run the prepare.yaml and inventory.yaml scripts to deploy OpenShift Origin on all your servers.
Go back to your home directory and run the following command:
[centos@<ip-address> ~]$ ansible-playbook prepare.yaml -i inventory.yaml --key-file himanshu-tokyo.pemIf you get the following error, simply run the previous command again:
TASK [enable docker] ***************************************************************************************
fatal: [<ip-address>]: FAILED! => {"changed": true, "cmd": "sudo systemctl enable docker && sudo systemctl start docker", "delta": "0:00:00.221729", "end": "2019-10-22 15:40:59.955707", "msg": "non-zero return code", "rc": 1, "start": "2019-10-22 15:40:59.733978", "stderr": "Created symlink from /etc/systemd/system/multi-user.target.wants/docker.service to /usr/lib/systemd/system/docker.service.\nJob for docker.service failed because the control process exited with error code. See \"systemctl status docker.service\" and \"journalctl -xe\" for details.", "stderr_lines": ["Created symlink from /etc/systemd/system/multi-user.target.wants/docker.service to /usr/lib/systemd/system/docker.service.", "Job for docker.service failed because the control process exited with error code. See \"systemctl status docker.service\" and \"journalctl -xe\" for details."], "stdout": "", "stdout_lines": []}
Here is what the output should look like when you run the command again:
[centos@<ip-address> ~]$ ansible-playbook prepare.yaml -i inventory.yaml --key-file himanshu-tokyo.pem

PLAY [nodes] **********************************************************************************************************

TASK [install python2] ************************************************************************************************
changed: <IP_ADDRESS>
changed: <IP_ADDRESS>
changed: <IP_ADDRESS>

TASK [remove kube] *****************************************************************************************
changed: <IP_ADDRESS>
changed: <IP_ADDRESS>
changed: <IP_ADDRESS>

TASK [install NetworkManager] ******************************************************************************
changed: <IP_ADDRESS>
changed: <IP_ADDRESS>
changed: <IP_ADDRESS>

TASK [install NetworkManager] *****************************************************************************************
changed: <IP_ADDRESS>
changed: <IP_ADDRESS>
changed: <IP_ADDRESS>

TASK [install the latest version of Apache] ***************************************************************************
ok: <IP_ADDRESS>
changed: <IP_ADDRESS>
changed: <IP_ADDRESS>

TASK [enable network-manager] *****************************************************************************************
 [WARNING]: Consider using 'become', 'become_method', and 'become_user' rather than running sudo

changed: <IP_ADDRESS>
changed: <IP_ADDRESS>
changed: <IP_ADDRESS>

TASK [enable docker] **************************************************************************************************
changed: <IP_ADDRESS>
changed: <IP_ADDRESS>
changed: <IP_ADDRESS>

TASK [Add repository] *************************************************************************************************
ok: <IP_ADDRESS>
changed: <IP_ADDRESS>
changed: <IP_ADDRESS>

PLAY RECAP ************************************************************************************************************
<IP_ADDRESS>              : ok=6    changed=4    unreachable=0    failed=0    skipped=0    rescued=0    ignored=0
<IP_ADDRESS>               : ok=6    changed=6    unreachable=0    failed=0    skipped=0    rescued=0    ignored=0
<IP_ADDRESS>               : ok=6    changed=6    unreachable=0    failed=0    skipped=0    rescued=0    ignored=0
Now we are ready to run prerequisites.yml file from the git repo we checked out:
[centos@<ip-address> ~]$ ansible-playbook openshift-ansible/playbooks/prerequisites.yml -i inventory.yaml --key-file himanshu-tokyo.pemI won’t paste the output of the above command here because it is really long. It should take about a minute to complete.
Once it’s done, run the following command to deploy the cluster:
[centos@<ip-address> ~]$ ansible-playbook openshift-ansible/playbooks/deploy_cluster.yml -i inventory.yaml --key-file himanshu-tokyo.pemAgain, the output of this command is really long so I won’t paste it here. It will take few minutes to complete so feel free to grab a cup of coffee while you wait.
Here is what the last bit of my output looked like:
PLAY RECAP *************************************************************************************************
<ip-address>               : ok=128  changed=53   unreachable=0    failed=0    skipped=164  rescued=0    ignored=0
<ip-address>              : ok=128  changed=53   unreachable=0    failed=0    skipped=164  rescued=0    ignored=0
<ip-address>              : ok=719  changed=312  unreachable=0    failed=0    skipped=1012 rescued=0    ignored=0
localhost                  : ok=11   changed=0    unreachable=0    failed=0    skipped=5    rescued=0    ignored=0


INSTALLER STATUS *******************************************************************************************
Initialization               : Complete (0:00:17)
Health Check                 : Complete (0:00:42)
Node Bootstrap Preparation   : Complete (0:03:19)
etcd Install                 : Complete (0:00:37)
Master Install               : Complete (0:04:26)
Master Additional Install    : Complete (0:00:34)
Node Join                    : Complete (0:00:38)
Hosted Install               : Complete (0:00:50)
Cluster Monitoring Operator  : Complete (0:01:19)
Web Console Install          : Complete (0:00:53)
Console Install              : Complete (0:00:25)
Service Catalog Install      : Complete (0:03:37)
Phew, this is it guys. At this point, OpenShift Origin has been installed on our three nodes. To confirm that, run this command:
[centos@ip-172-31-28-201 ~]$ oc get nodes
NAME                                               STATUS    ROLES          AGE       VERSION
<internal-ip-address>    Ready     compute        15m       v1.11.0+d4cacc0
<internal-ip-address>   Ready     compute        15m       v1.11.0+d4cacc0
<internal-ip-address>   Ready     infra,master   18m       v1.11.0+d4cacc0
Sweet! This confirms that OpenShift was installed successfully. Now, let’s bring up the OpenShift WebUI by going to: https://<public_hostname_master_node>:8443/console
You should be able to see the login page where you can login by using username/password as ‘admin’.

That’s it. We now have OpenShift Origin installed!
Remember to delete your stack once you are done from CloudFormation page or else you will incur unnecessary costs!
Once again, I would like to thank Thilina for his original post which helped me setup OpenShift. This post is simply meant to complement Thilina’s work and to show some potential errors you might encounter while installing OpenShift.
2 replies on “Deploying an OpenShift (okd) cluster on AWS”
Hi Himanshu ,
Good Document , I am also planning to build for learning , additionally AWS billing estimation will be helpful if you can update
Hi Himanshu ,
I tried to follow step by step your document , but at the end the follow error appear
TASK [openshift_control_plane : Report control plane errors] **************************
fatal: [ip-172-31-27-224.eu-south-1.compute.internal]: FAILED! => {“changed”: false, “msg”: “Control plane pods didn’t come up and become ready”}
Failure summary:
1. Hosts: ip-172-31-27-224.eu-south-1.compute.internal
Play: Configure masters
Task: Report control plane errors
Message: Control plane pods didn’t come up and become ready
And after that it is not more possible to log in to any node !
Have you any clue ?
Thanks !
jermaine