
An event broker, like Solace’s PubSub+ broker, can be used for a variety of different usecases that if you were to simply deploy it following the deployment guide and best practices, you will most likely achieve the performance you are looking for. For example, if you are a retail supermarket who is looking to publish approximately 100 msgs/s through the broker, you will not have any issues. But if you have a usecase that will push the limits of a single software broker, you need to get creative and learn to fine-tune the performance of the broker.
In this blog post, I will show you ways in which you can squeeze out that last bit of performance from your broker and impress everyone at your company.
An example scenario we will focus on is of a software broker deployed in Asia getting data from US. In a specific usecase I worked on, the data was coming from PubSub+ appliance in NY over a VPN bridge to software broker. But the appliance can be any publisher sending data over VPN bridge.
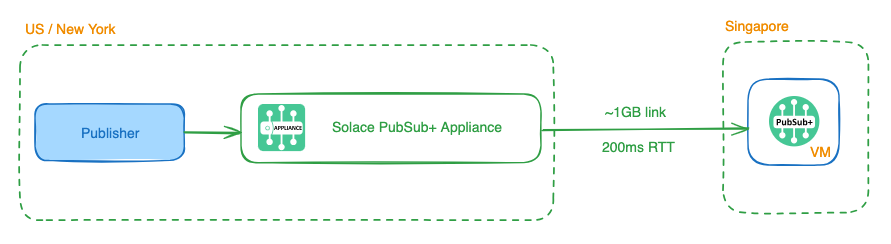
When the software broker was deployed and bridge was established to the appliance, the default throughput was around ~2MB/s which is very low. The Round Trip Time (RTT) is approximately 200 ms between NY and Singapore datacenters.
1. Pick The Right Tier and Host
Solace PubSub+ broker comes in multiple sizing tiers and each tier allows you to leverage additional cores and get better performance.
These tiers and associated cores are:
- 1K Connections
- Standard Edition – 2 cores (limited to 10,000 msgs/s)
- Enterprise Edition – 2 cores (no throughput limit)
- 10K Connections – 4 cores
- 100K Connections – 8 cores
- 200K Connections – 12 cores
Note: Solace Cloud deployments have additional tiers which are not available with self-managed software broker.
You can find necessary information on minimum requirements for container/underlying host here for each tier.
Needless to say, the first step is to make sure you have picked the right broker tier for your usecase and have deployed it on a host with appropriate resources (CPU cores, memory, storage etc.).
For our example, we decided to use 10K tier Enterprise broker to be able to support our desired throughput.
2. Pick The Appropriate Storage
As you know, Solace PubSub+ brokers support in-memory (Direct) and persistent (Guaranteed) messaging. If your usecase consists of Guaranteed Messaging then you need to ensure you are using a performant storage for your usecase.
Obviously, picking an SSD over a traditional hard disk drive would give you much better performance albeit at a higher cost. Similarly, if you are deploying the software broker yourself on the cloud, you will have a variety of options to pick from. Make sure you pick the right type of storage with high IOPS to get the performance you want.
At the broker level, you can measure disk latency which measures the speed at which the broker is able to access disk. This can help you identify if there are any bottlenecks due to disk.
solace(configure/system/health)# show system health

Statistics since:  Dec 28 2023 17:26:41 UTC

                   Units   Min      Max      Avg      Curr     Thresh    Events
                   ------  -------  -------  -------  -------  --------  -------
Disk Latency       us      1645     16067    6541     1911     10000000  0
Compute Latency    us      974      23463    1272     1139     500000    0
Network Latency    us      0        0        0        0        2000000   0
Mate-Link Latency  us      0        0        0        0        2000000   0
3. Tweak the Publishing Window Sizes
My colleague, several years ago, wrote a very handy post on this topic and I definitely recommend checking it out.
When an application publishes messages using Persistent delivery mode, the Publish Window will determine the maximum number of messages the application can send before the Solace API must receive an acknowledgment from the Solace Message Router. The size of the window defines the maximum number of messages outstanding on the wire.
This property is generally not required to change unless your applications are publishing to the broker over a WAN link (i.e. broker and applications are deployed in different regions). The default value is set to 50 on Solace APIs with one exception. The JMS API, due to its defined spec, can only send one message at a time before receiving an acknowledgement! This means when an application publishes a message, the message has to go over the network to the broker, the broker needs to process it and (if applicable) send it to the backup broker, before sending an acknowledgement back to the application. Once the acknowledgement is received, the application can publish next message.
So, increasing the Publish Window Size can increase the throughput but also increase risk of greater number of messages in-flight potentially getting lost (maybe due to network outage) and needing to be re-published. There is always a trade-off.
4. Enable Compression
This is an obvious one but one that gets overlooked easily. Solace PubSub+ brokers support compression. Instead of sending the full payload size, you can instead send the compressed payload and hence, achieve a higher throughput.
When configuring compression, there are two modes you can select: optimize-for-size and optimize-for-speed. Here is more information about each mode from the doc:
When a TCP listen port is configured to use compression, you can configure whether you want the event broker to compress the data in egress messages so that it is optimized for size or for transmission speed. In general, the optimize-for-size mode yields a higher compression ratio with lower throughput, while optimize-for-speed mode yields a higher throughput with lower compression ratio.
Pick the optimize-for-speed mode for higher throughput!
5. Tweak the host TCP settings
This is a very important one and one that not many people think of doing. Solace brokers run on top of the underlying hosts’s TCP stack. The connections established by publishers and subscribers with the broker are TCP connections so naturally, tuning the TCP stack is crucial.
For PubSub+ appliances, Solace has already tuned everything as much as possible so the only thing left to tune is the TCP Maximum Window Size which can be configured at the broker level. For Software broker, we need to tune the TCP stack of the underlying host/VM as well as the TCP Maximum Window Size at the broker level.
As mentioned earlier, many times you are looking to improve performance when either the publisher or subscriber is in a different region than the broker. In such cases, your application is establishing a connection over the WAN so WAN Tuning is required. To do so, you need to modify your TCP Maximum Window Size. Rule of thumb is to set the TCP Max Window Size to be twice of Bandwidth Delay Product (BDP). BDP can be calculated as
BDP (Bytes) = (max-bandwidth (bps) / 8) * RTT (µs) / 1,000,000
where RTT is round-trip time.
For our usecase, we have a max-bandwidth of ~900KB/s with RTT of 0.200 seconds (200ms).
BDP = 900KB/s * 0.200 = 900*1024*0.200 = 184,320
TCP Max Window Size = 2 * BDP = 368,640 / 1024 = 360 KB
Once calculated, TCP Window Sizes can be configured by following the instructions documented here. This change is at the broker level.
You can go a step further and make changes to the host level TCP stack configuration. Here is a good source for understanding how TCP tuning works and different parameters such as wmem and rmem.
After some further tuning, we updated the TCP stack of the underlying VM on which software broker was deployed on in Asia with the following commands and it improved the throughput instantly by ~5 times!
echo 68157440 >/proc/sys/net/core/rmem_max
echo 68157440 >/proc/sys/net/core/wmem_max
echo "4096 16777216 68157440" > /proc/sys/net/ipv4/tcp_rmem
echo "4096 16777216 68157440" > /proc/sys/net/ipv4/tcp_wmem
service network restart
See this doc for more information on Tuning Link Performance for WANs.
6. Optimize E-gress Queue Sizes
As you make the TCP level changes mentioned above, you will be able to achieve higher throughput which means your consumers have to be able to keep up with higher message rates. If your consumers are unable to do so, the broker will start discarding direct messages and queuing up guaranteed messages.
To eliminate or reduce the discards, you should understand how egress queues work in Solace.
The message first passes through one of the five per-client priority data queues. A scheduler then selects it and places it into a single, per-client Transmission Control Protocol (TCP) transmit queue.
Solace Docs
The queue sizes can be modified to accommodate your usecase. To reduce Direct messaging discards, you can increase D-1 queue size which increases the number of messages that can be queued up to be delivered to a consumer. More information on how to make the change here.
Additionally, you should also modify the tcp stack of the host where consumer applications are running to ensure they are perfectly tuned to handle higher ingress throughput.
Conclusion
I hope you found this post helpful. As a Solutions Architect, these are all the steps I follow whenever I am asked to help a customer improve performance. There is an art to how you implement each step since you have to tune several parameters to achieve the optimal results for your usecase. As you go through these steps, feel free to tweak the parameters appropriately for your specific usecase.