I am no OpenShift expert but last few days, I have been working on spinning up an OpenShift cluster on AWS. At first, I thought it would take me around a day or at max 2 days but it took me quite a few days to fully get it up and running. This post is my effort to hopefully make it easier for others to deploy OpenShift.
What is OpenShift?
“OpenShift is an open source container application platform by Red Hat based on the Kubernetes container orchestrator for enterprise app development and deployment.” It is powered by okd which is ‘origin community distribution of kubernetes’.
It is commonly known as PaaS – platform as a service. It is just another ‘aaS’ that you have to be aware of like ‘SaaS’, ‘IaaS’, ‘DaaS’ and even ‘KaaS’ (Kitchen as a Service which is what I am naming Ghost Kitchens).
In today’s world, you have docker containers that make it easier for you to share and deploy images. Then, you have kubernetes that is an orchestration layer open-sourced by Google which sits on top of docker. Finally, you have OpenShift that sits on top of kubernetes and docker and helps you coordinate everything. It not only makes development but also deployment to all the nodes in your cluster(s) piece of cake (that might be an overstatement). If you didn’t understand what I just said or would like to learn a bit more about OpenShift, I recommend checking out this useful video by IBM.
Different flavors of OpenShift
Before I show you how to deploy OpenShift, it is important to make some distinctions between different flavors of OpenShift and which one we will be working with in this post.
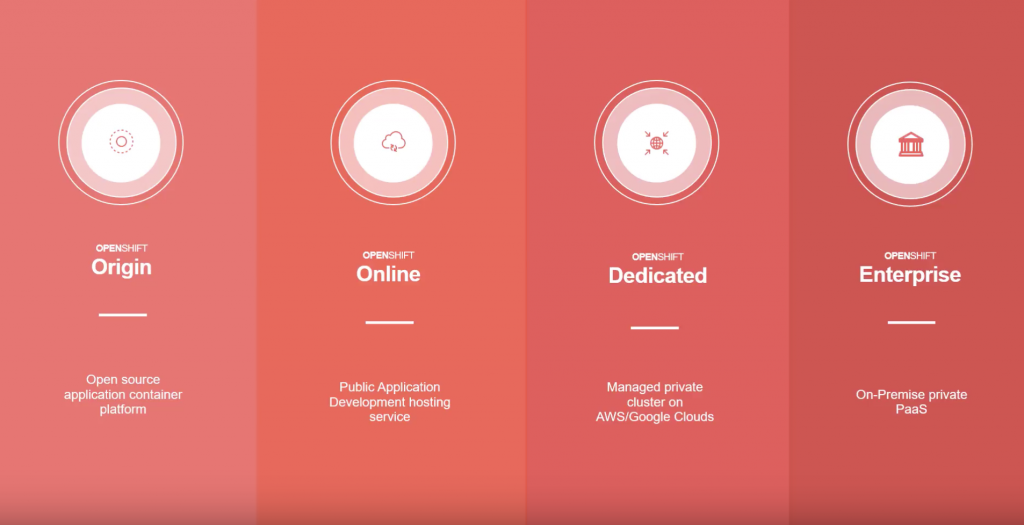
There are four versions of OpenShift:
- Origin – open-source version
- Online – managed service version by RedHat (includes free tier)
- Dedicated – managed private cluster deployment on cloud by Red Hat
- Enterprise – on-prem cluster deployment by Red Hat
Here is a nice visual taken from this video by KodeCloud:
In this post, we will be particularly working with the Enterprise version which means you MUST have an OpenShift license or else there is no point following this post. Turn back if this doesn’t apply to you. You have been warned!
You should also have a Red Hat account which you can sign up for here.
Note: This post might seem long and you might be tempted to skip steps and jump around. I did that with other documentations and ended up wasting a lot of time only to go back and do everything properly. So, please read all the steps and follow them first and if something goes wrong, then try doing other steps you got from other resources.
Getting Started
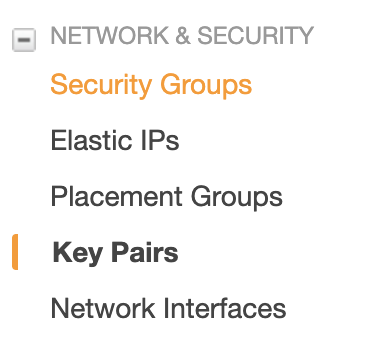
There are few housekeeping things you should get out of the way. First of all, go to your AWS account and make sure you have an access key so that you can use it for the deployment. You can do so by going to EC2 page >> Key Pairs tab under Network & Security section on the left side >> Create Key Pair.
Getting OpenShift Pool Id
To deploy OpenShift cluster, we will need something called a Pool Id. As of right now, I don’t really know what it is used for but as soon as I do, I will update this post. Alternatively, if you know what it is, please leave a comment.
It took me several hours to figure out how to get my OpenShift Pool ID so be glad that I am showing you how to do it and saving you hours!
You will first need a Red Hat server to get your Pool Id. If you don’t have one handy, don’t worry, this is what AWS is for. You can spin up an RHEL EC2 instance which falls under free tier.
Once you have the instance up, you will need to follow the instructions mentioned on this page.
You should only need to run the first four commands:
sudo subscription-manager register --username=<user_name> --password=<password>
sudo subscription-manager refresh
sudo subscription-manager list --available --matches '*OpenShift*'

/ The output of the command above should give you the Pool Id which you should keep handy to use later.

sudo subscription-manager attach --pool=<pool_id>
After you have run these commands and gotten the Pool Id, you are ready to finally spin up the OpenShift cluster.
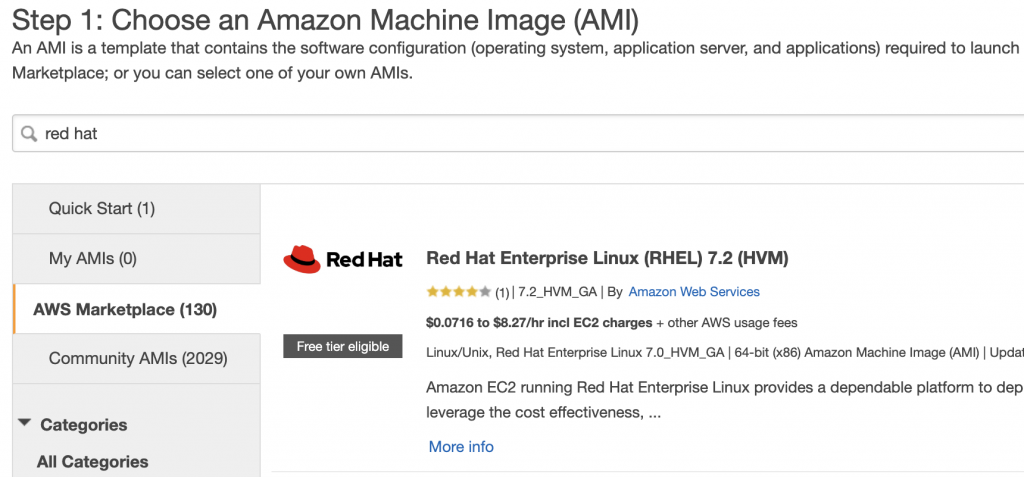
Now here is the trick, when I tried doing this with the quick-start AMI with RHEL 8, it didn’t work for me. I kept getting these errors when I tried to get my Pool Id.
Traceback (most recent call last):
  File "/usr/lib/python3.6/site-packages/dnf/repo.py", line 566, in load
    ret = self._repo.load()
  File "/usr/lib64/python3.6/site-packages/libdnf/repo.py", line 503, in load
    return _repo.Repo_load(self)
RuntimeError: Failed to synchronize cache for repo 'rhui-client-config-server-8'

During handling of the above exception, another exception occurred:

Traceback (most recent call last):
  File "/usr/lib64/python3.6/site-packages/subscription_manager/cache.py", line 173, in update_check
    self._sync_with_server(uep, consumer_uuid)
  File "/usr/lib64/python3.6/site-packages/subscription_manager/cache.py", line 477, in _sync_with_server
    combined_profile = self.current_profile
  File "/usr/lib64/python3.6/site-packages/subscription_manager/cache.py", line 430, in current_profile
    module_profile = get_profile('modulemd').collect()
  File "/usr/lib64/python3.6/site-packages/rhsm/profile.py", line 347, in get_profile
    profile = PROFILE_MAP[profile_type]()
  File "/usr/lib64/python3.6/site-packages/rhsm/profile.py", line 54, in __init__
    self.content = self.__generate()
  File "/usr/lib64/python3.6/site-packages/rhsm/profile.py", line 76, in __generate
    base.fill_sack()
  File "/usr/lib/python3.6/site-packages/dnf/base.py", line 400, in fill_sack
    self._add_repo_to_sack(r)
  File "/usr/lib/python3.6/site-packages/dnf/base.py", line 135, in _add_repo_to_sack
    repo.load()
  File "/usr/lib/python3.6/site-packages/dnf/repo.py", line 568, in load
    raise dnf.exceptions.RepoError(str(e))
dnf.exceptions.RepoError: Failed to synchronize cache for repo 'rhui-client-config-server-8'

During handling of the above exception, another exception occurred:

Traceback (most recent call last):
  File "/sbin/subscription-manager", line 11, in <module>
    load_entry_point('subscription-manager==1.23.8', 'console_scripts', 'subscription-manager')()
  File "/usr/lib64/python3.6/site-packages/subscription_manager/scripts/subscription_manager.py", line 85, in main
    return managercli.ManagerCLI().main()
  File "/usr/lib64/python3.6/site-packages/subscription_manager/managercli.py", line 2918, in main
    ret = CLI.main(self)
  File "/usr/lib64/python3.6/site-packages/subscription_manager/cli.py", line 183, in main
    return cmd.main()
  File "/usr/lib64/python3.6/site-packages/subscription_manager/managercli.py", line 506, in main
    return_code = self._do_command()
  File "/usr/lib64/python3.6/site-packages/subscription_manager/managercli.py", line 1368, in _do_command
    profile_mgr.update_check(self.cp, consumer['uuid'], True)
  File "/usr/lib64/python3.6/site-packages/subscription_manager/cache.py", line 457, in update_check
    return CacheManager.update_check(self, uep, consumer_uuid, force)
  File "/usr/lib64/python3.6/site-packages/subscription_manager/cache.py", line 183, in update_check
    raise Exception(_("Error updating system data on the server, see /var/log/rhsm/rhsm.log "
Exception: Error updating system data on the server, see /var/log/rhsm/rhsm.log for more details.
If this happens to you as well, my advice is to try another AMI with a different RHEL version. I tried RHEL 7.2 by selecting AWS Marketplace tab on left and that did the trick.
Deploying OpenShift Cluster
It’s the moment you have been waiting for. We are finally going to deploy an OpenShift Cluster on AWS.
We will be deploying this crazy looking cluster:
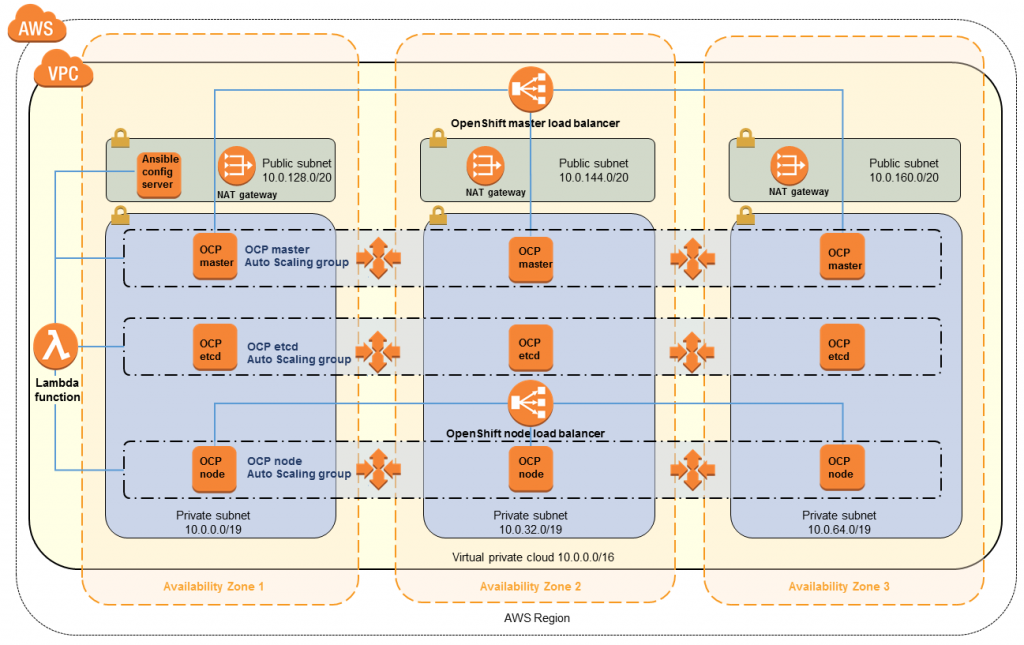
It consists of (a lot of things):
- 1 VPN spanning 3 Availability Zones with one private and one public subnet each zone
- 1 internet gateway
- An ansible config server instance in one of the public subnets
- In the private subnets:
- 3 OpenShift master instances in an Auto Scaling group
- 3 OpenShift etcd servers in an Auto Scaling group
- A variable number of node instances in an Auto Scaling group
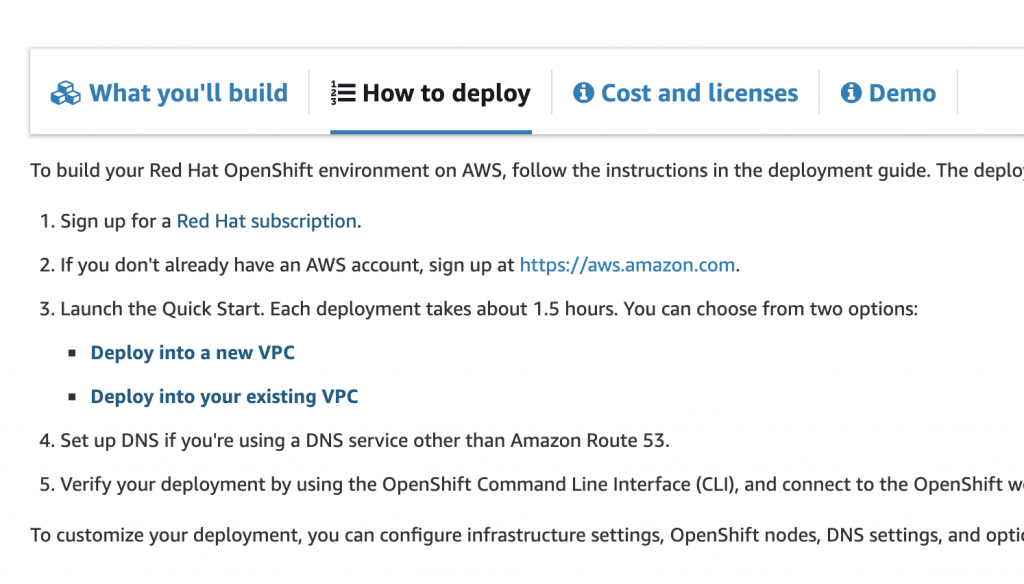
Go to this page for official deployment of OpenShift. Scroll down to How to Deploy tab and click on it. Then, pick the option that works best for you. I chose the option Deploy into a new VPC.
Clicking on that link takes you to a CloudFormation page. In case you are not familiar with CloudFormation, it’s a handy tool by AWS to spin up a bunch of AWS infrastructure resources using a pre-defined template. OpenShift has conveniently created a template and we will simply use it.
I recommend taking a look at the documentation that came with this template which goes over all the variables that will need to be defined before we can run this template as well as some of the costs associated with deploying this cluster. OpenShift requires a certain level of infrastructure which goes beyond what AWS offers in free-tier.
Going back to our CloudFormation template, you should have this page in front of you:
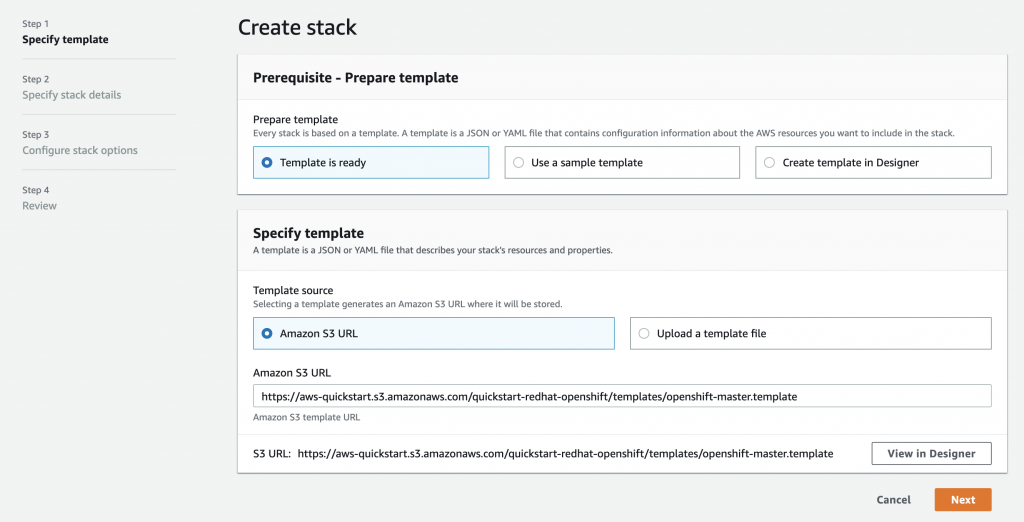
Make sure that you have the correct AWS region selected on top right whether it be US-East, US-West or any other region. Then, click on Next.
On the next page, we have to specify our stack details. Keep all the defaults as they are unless you have specific reason to change them. There are some mandatory fields that you will need to fill:
- Availability Zones – Select three availability zones from the drop down menu.
- Allowed External Access CIDR (OCP UI): 0.0.0.0/0
- Allowed External Access CIDR (OCP Router): 0.0.0.0/0
- SSH Key Name: Select the key that you created at beginning of this post
- OpenShift UI Password – select a password you will use to login to OpenShift UI once it is deployed
- Red Hat Subscription Username – username for your Red Hat account
- Red Hat Subscription Password – password for your Red Hat account
- Red Hat Pool Id – this is the Pool Id we got earlier
Click Next after you have filled all these details.
Next page is Configure Stack Option which you can ignore by scrolling down and clicking on Next.
Then, you need to review all the details you have entered, acknowledge it and click on Create Stack.
Once that’s done, you will have to wait around 40-60 minutes for the full deployment to be complete.
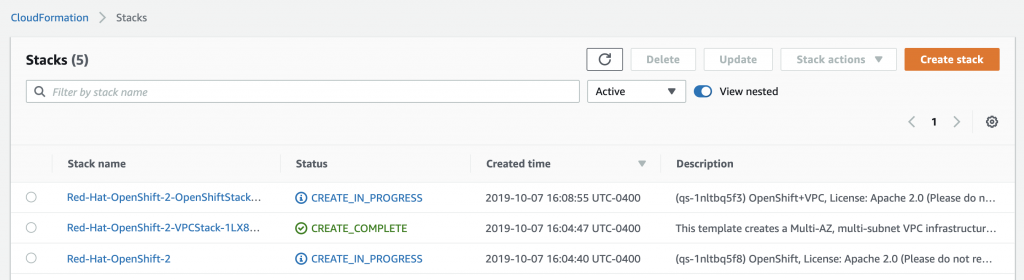
Once the stack’s status is CREATE_COMPLETE, click on the Stack name and then go to Outputs tab to find Value for OpenShiftUI key. This is the URL that you will use to access your OpenShift UI.
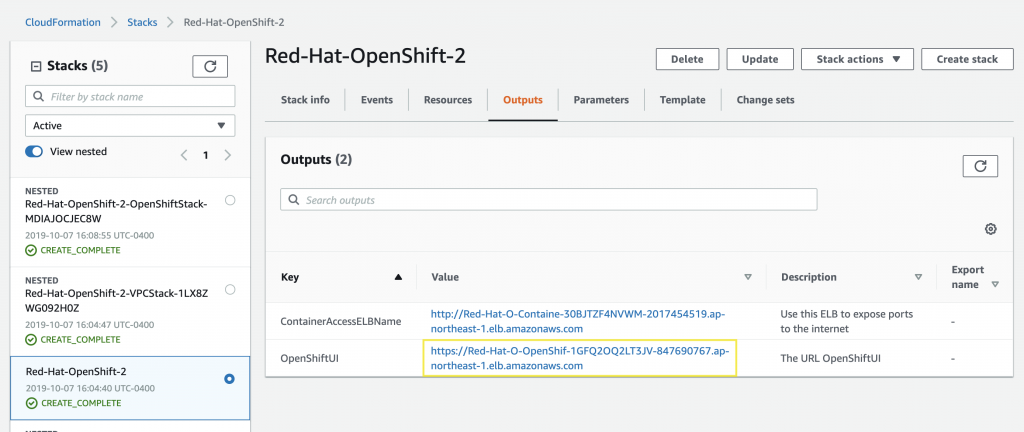
Open up that URL and you will be taken to a dark page where you will have to enter the credentials that you entered in the template (default username is admin unless you changed it).
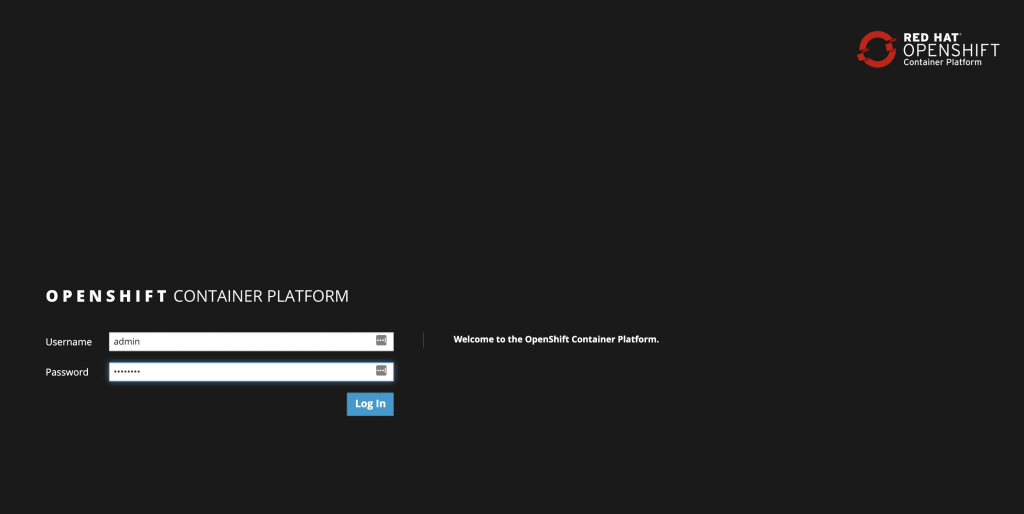
Login and that’s it! You have your complete deployment of the OpenShift cluster.
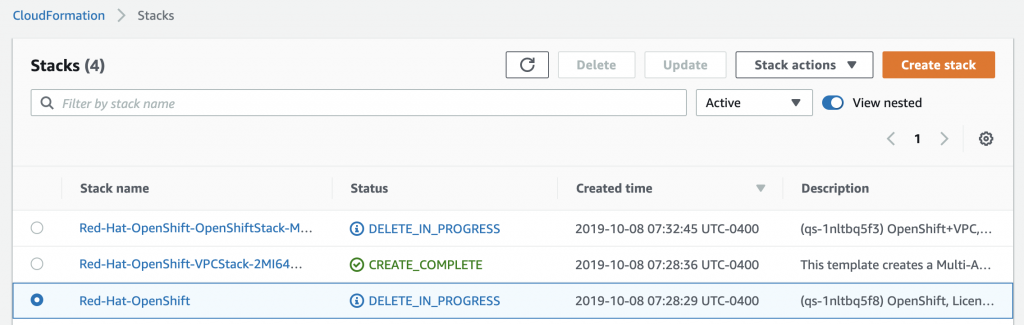
Once you done with your OpenShift deployment, remember to destroy it or else you will keep incurring AWS costs. You can do so by going to your AWS CloudFormation page which lists all your stacks and delete them. This will make sure that all the resources that were created as part of this cluster are cleanly removed.
I have to say it was not easy to figure it all out but once I did, it seemed quite straightforward because it alway does. Despite laying these steps out for you, you will probably still face some challenges when doing this yourself. All I can say to you is, I hope it takes you less time than it took me and good luck!